Tutorials Starting Out in Environment Art in Unreal Engine 4
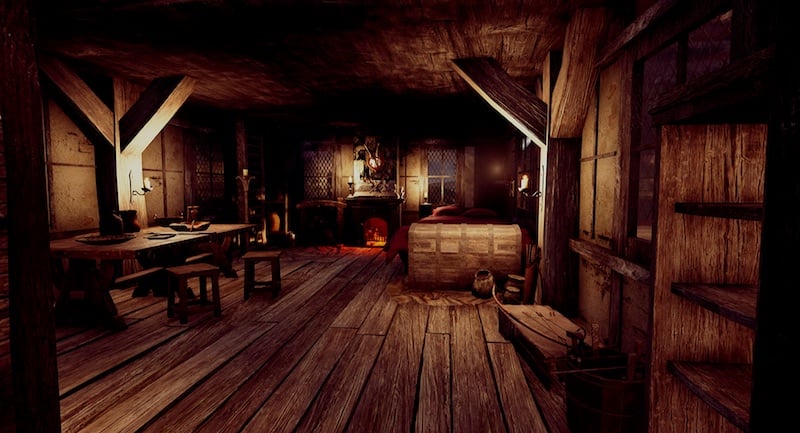
Nosotros asked CG Spectrum Game Pattern Course pupil Oliver Rotter to take u.s.a. through his process of creating a panoramic mountain scene in Unreal Engine. This 3D surround was a side project that Oliver used to upgrade his skills along with the help of mentors Scot Bayless and William Faucher. Thanks Oliver for your meticulous step-by-step guide! My name is Oliver and I am currently a Game Design pupil and Didactics Assistant at CG Spectrum. This is my procedure of creating the "Hunter'south Mount Motel" scene created in Unreal Engine 4 with the support of my mentor Scot Bayless. The last time I had touched Unreal Engine was a few years back, so Scot recommended tutorials to watch over the winter holidays to familiarize myself with the engine once more. The official Unreal Online Learning Courses are astonishing. I recommend the most recent tutorials on game design for anyone who is starting out. I benefited from having experience with game evolution, programming, and game engines, so I rapidly refreshed my understanding of the basics. And then I decided to test my skills by building a minor environs. With the goal set, the vision of building a beautiful scene in Unreal Engine had solid direction. But I was still new to the software and the concept was still vague. And then I decided to clarify my idea by asking myself "W" questions. This is a technique one of my mentors taught me. Enquire yourself questions like what do I want to create? when do I want to stop information technology? what skills are needed to build this? But the most of import question is why practise I want to do this? By asking these questions I establish the solutions to developing my project in the management I wanted. I likewise found the resources and developed the skills required to fulfill my vision. A good style to develop your concept is to reference the outside world. To not just detect the answers in yourself merely to find inspiration from the world around you. This also relates to finding inspiration from other works. The internet provides the states with boundless resources and references. Many new artists are afraid to employ other artists' work as inspiration, but art is endlessly referential. Experience free to pay homage to creators you lot admire, they have inevitably been influenced by their favorite artists. I decided on a scene of a cabin almost a mountain lake with a waterfall and a forest in the groundwork. If you lot thought "I bet this guy got his idea from watching Bob Ross", so you are completely right! As Bob Ross said, the beauty of life is all around us, you just have to be open to it. I drew some compositional sketches to put ideas to newspaper. As soon as I felt I had the correct limerick I blocked out the landscape and shape in Unreal Engine. Sometimes things that await or audio good in your head are non always the all-time when they are brought to life. So it's always good to test a concept, sketch it out and explore it before taking information technology further. For the starting time blockout, I used free-to-employ avails from the Unreal Engine Market place and Quixel Megascans. Once I had my first 3D sketch the next job was to get in more visually highly-seasoned past finding avails and learning methods to improve the slice. In my research, I stumbled upon Joe Garth's YouTube channel which features tutorials on how to create environments in Unreal Engine. He works for Epic Games Quixel and is also the creator of some amazing nugget packs that are beginner-friendly. So I picked up his Brushify surround pack from Unreal Engine Marketplace and followed his tutorials. Since they were well fabricated and accessible I speedily picked up his workflow methods. After making some mural projects, I used these assets and my new skills to brand a second iteration of the Hunter'due south Mountain Cabin project. As you can run into in the picture, I changed the limerick and assets to give the scene more brownie. Now that I had a solid concept, I added more details to the scene - rocks, a road, a ruin, bushes, and trees. During this process, information technology is always good to have references on hand. Similar I said earlier, don't be afraid to exist influenced past other people's piece of work or to imitate mother nature itself. To create a compelling, realistic mural, references are crucial! The scene slowly came together. Equally you tin encounter in the picture above, there are more details, I added elements like the ruins on the left and the tree with the stone formation on the right. I also changed the photographic camera position to piece of work meliorate with the new composition, this camera angle became one of the chief frames. Something I still wasn't satisfied with was the mountain ridge in the groundwork. The forest and the mountains felt unnatural. Having grown up in Austria, in the heart of the Alps, I am familiar with this kind of geography. My mentor Scot gave me some helpful advice on what to touch up and where to make changes. So I looked upward references and assets to create a compelling snowy mount ridge. Mixing dissimilar copse and vegetation elements too gave the scene more credibility. From start to cease I was constantly refining my vegetation assets every bit well as creating my own models. I grabbed a costless waterfall asset from the marketplace and added it to the scene. While irresolute the mountain ridge I noticed that the sky needed refining, I found the Ultimate Sky asset pack in Unreal Engine Marketplace. It'due south a blueprint for creating stunning solar day and night cycles as well equally spectacular atmospheric condition effects. The pack is highly intuitive to use, is affordable, and delivers value for money. The scene now had a solid foundation, just I wanted to push it further, so I added noise to give it more credibility. I added more details to the area effectually the house and decorated its interior. For that, I used a lot of free assets from Quixel Megascans and Unreal Engine Marketplace, likewise as some purchases from Marketplace. I and so created materials and basic avails, not considering I want to be a modeler or material designer, simply because I like to know and understand a procedure even if I don't desire to become an expert in that field. But having a basic understanding of a topic tin can be a corking do good, especially in game development where people'southward tasks are often closely linked and co-dependent on each other. Earlier this project, I barely had an understanding of what lighting and mail service process can do and was surprised at how they can drag a scene. No wonder this field is an expertise of its own. For this task I created a smaller written report of a forest scene to larn more most creating an environmental scene. I used tutorial guidance to create landscape materials and to model basic vegetation. With these new skills, I went back to my Hunter's Mountain Cabin project where I practical what I'd learned. My goal was to create a golden hour mood, which was recommended by my mentor Scot. He also advised me on the sky treatment and the fog height to further make the scene await similar the real bargain. With the lighting and post procedure finished I made a showcase video with a flythrough of the scene, as well equally inserting additional compositional shots. This was a big task considering I had no prior experience with cinematics in Unreal Engine or in video editing. So I practical my usual strategy of enquiry and practice to reach the task. As the terrain developed I curated the trees surrounding the house and worked out how the path leads down to the main route. I so decided to create a room interior. For the room interior, I used the model from the Brushify Asset Pack to create the layout of the walls and for the roof construction of the house. I applied the wood plank texture for the floor and inverse the roof texture. I adjusted the base of the house to a rectangle and placed stone bricks on the exterior. I was pleased with the results and added stairs to the front end of the house. I used the aforementioned stone bricks to indicate a path going from the house to the principal route. With the foundation of the house established, the next step was to add details. Houses are often made up of elementary shapes and parts. I used wood planks and trims on the walls and roof, and then I added plants and decals to make it look old and weathered. For the interior, I decided to go for a one room layout with a ladder leading to the upper floor. I wanted the room to accept lots of details just remain open and then y'all can see through information technology without obstacles hindering the view. That'due south why I placed the beams of the business firm on the outer walls. The main focus of the room would be the fireplace, then the bed, table, and a working area, which subsequently became the writing table. I wrote down lists of objects and materials that you would find in a cabin. With the list, I gathered assets from costless sources like the Quixel Megascans Library and paid for asset packs from Unreal Engine Market place. I did the same for the environment surrounding the cabin, making a list of foliage for the surface area. I used tree stump models and cut wood to betoken humans interacting with nature. [featured] By this stage I had downloaded all the assets I needed and had imported them into Unreal Engine. I archived all the elements into an asset zoo and made all the necessary modifications. Later on everything was bundled and amended, I started placing the assets into the level. I used a lot of references, especially from games, replicating how they execute interior design and how item placement is used to tell a story. I was constantly asking the questions does that fit here? does it make sense and how does it fit into the bigger composition? With the outside details I was specially careful with placement and how they affected the composition of the firm and surrounding areas. I incorporated more noise to the surroundings by calculation grass and flower patches, as well as rock pebbles and tree trunks. I changed the surrounding terrain by paw and added stone formations and bushes to further refine the composition. And then it was fourth dimension to go back to relighting to further expand my skills and accept the scene to the next level. For this relighting project I got help from William Faucher, mentor of CGSpectrum's new 3D Realtime and Virtual Production Class. The first task in every iteration process is to assess what worked, what didn't piece of work, and what could be improved. The project got a lot of praise for its composition and mood, just there were still some flaws that needed to be addressed. The overall brightness and dissimilarity needed adjusting equally information technology was also nighttime, especially in the shadowed areas. So the next job was to adjust the lighting. I had done most of the lighting and post process in Unreal Engine and minimal changes in Da Vinci Resolve. I decided to switch the mail service procedure and edit in Da Vinci Resolve to improve my skills and to learn from William who specializes in the program. Having only barely covered the nuts of Da Vinci with the starting time iteration of the project, I asked William to cover the bones workflows and procedures again. I learned a lot from him on elevation of what I already knew from his keen Unreal Engine tutorials on YouTube. Before going into Da Vinci Resolve nosotros went over my projection in Unreal Engine to gear up cameras and sequences properly for the next stages. We also looked at some of the compositional elements of the scene and explored some possibilities. Nosotros tried different photographic camera positions, different camera and lighting settings. William showed me some tricks to get the most out of the engine by using the sequencer and picture render queue, which offers new 4.25 and four.26 options. For instance, I usually rendered my sequences in jpg, which limits what you tin can do in the mail service procedure in Da Vinci Resolve. With William'southward method, we extracted the images in exr and disabled the tone curve in the color output to have a better setup to work inside the post process. We worked in Da Vinci Resolve using the exr renders from Unreal Engine. These have a very different expect to the ones we would get from the normal jpg renders, just they gave united states manner more options to dispense them with Da Vinci Resolve. The programme offers a lot of ways to edit your shots, we focused primarily on the coloring department and worked with various correction nodes. Da Vinci Resolve likewise easily lets you appraise the color spaces through dissimilar curves and systems, this identifies dominant color ranges or issues with an epitome. For case, we recognized through a spike in the color curve that the waterfall was style as well bright and needed to be turned downwardly in Unreal Engine. In one case that was done, we started calculation nodes. Offset nosotros transformed the image with a color space transform node. Then we added a node to alter the overall base of operations colour curve to adjust unlike areas of the image. The curve displays the color variation from darkness (left) to low-cal (right), identifying the sweet spots for good base lightning composition. From there nosotros added one node at a time to change certain elements of the paradigm. For example a node for changing the temperature or ane for changing the midtones. With every node you can modify individual or multiple parts of the prototype, while still having total control of it. Da Vinci Resolve makes this process very intuitive and yous tin can always go back to modify or add nodes, allowing you freely experiment with different lighting treatments. William also showed me how to add special effects such equally a vignette and the glow event in just a few steps. These tin can too be done in Photoshop or other programs, but it's handy to exercise this straight in Da Vinci, specially with the node system being intuitive and beginner-friendly. After going over the process with different shots and trying out different settings I went for lighting that however has that gamey-fantasy look to it, but leans more towards a realistic cinematic look. I personally love punchy, saturated and contrast-driven pictures, that's why my images often tend to become into those directions, the aforementioned goes for my paintings. Going through the procedure with William I noticed how much nuance in that location is to virtual production and in item the field of color and lighting theory. Run across more than of Oliver'southward piece of work at https://oliver-rotter.com/ Learn game design using Unreal Engine from experts who guide yous towards upgrading your skills to a professional level. Our Game Design Course builds on your central skills to create immersive game levels and interfaces, combine different gameplay systems to create engaging experiences, and learn to launch a successful game. CG Spectrum is an Unreal Academic Partner and Unreal Authorized Preparation Centre. Have your talents to another level and launch your career! LEARN GAME Blueprint
I like to set high goals, breaking them down into milestones so I understand the process and make changes equally required. The benefit of this arroyo is that you remain flexible in reacting to the challenges of the projection.

Introduction
Getting back into Unreal Engine
The concept
Building the scene


Lighting & post process


Relighting

Assessment


One of the great things near CG Spectrum is that the mentors care for students as artistic individuals, and veer from the curriculum to meet their needs and requite them the all-time feel.
Looking for a career as a Game Designer?
Tags: Game Design , Community Spotlight , Tips & Tutorials , Realtime 3D
[more]Read CG Spectrum'southward bio[/more]
Source: https://www.cgspectrum.com/blog/create-environment-scene-in-unreal-engine-oliver-rotter